Showing posts with label Stampin 'Up!. Show all posts

Saturday, 19 July 2014

Happy Birthday

Addicted to CAS Challenge #43 - Celebrate


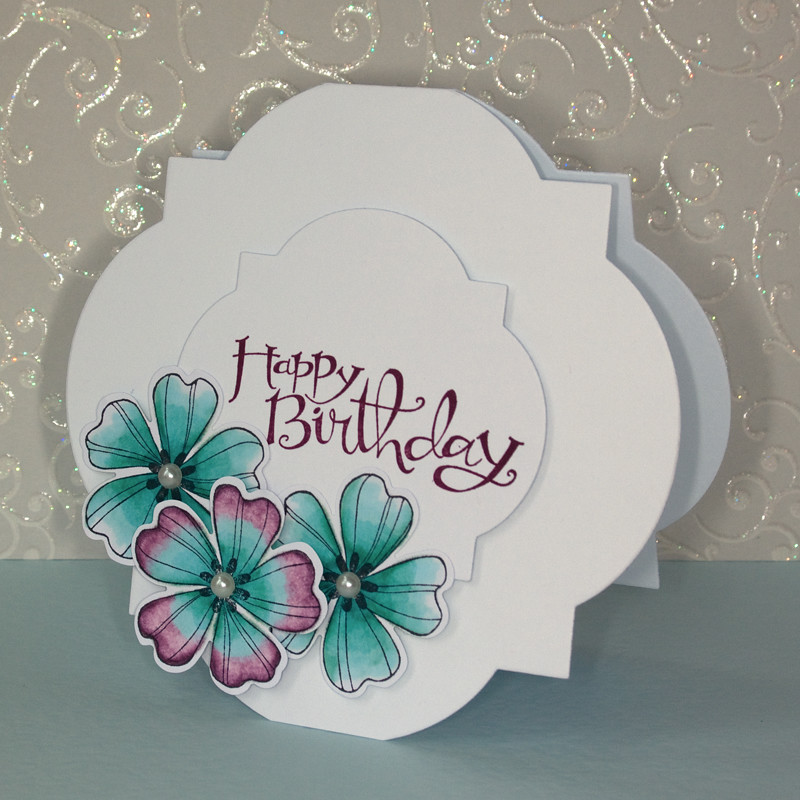
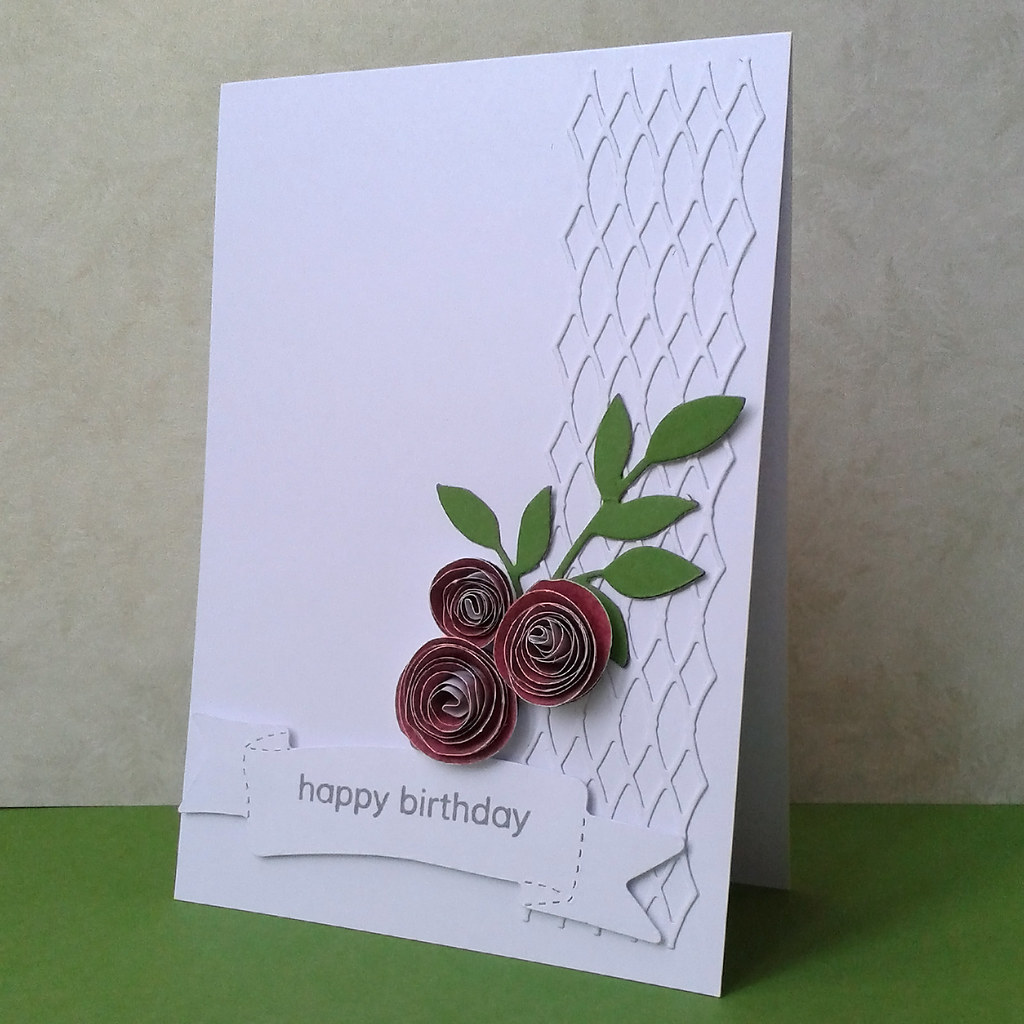
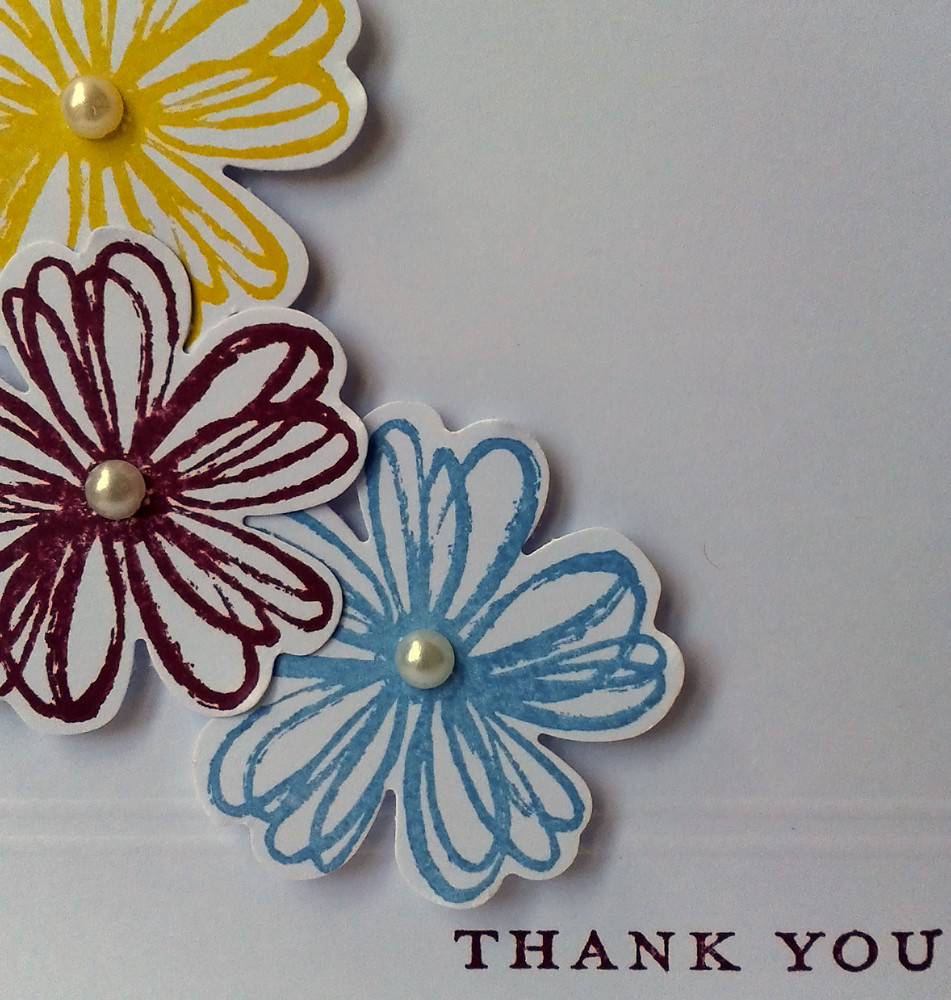
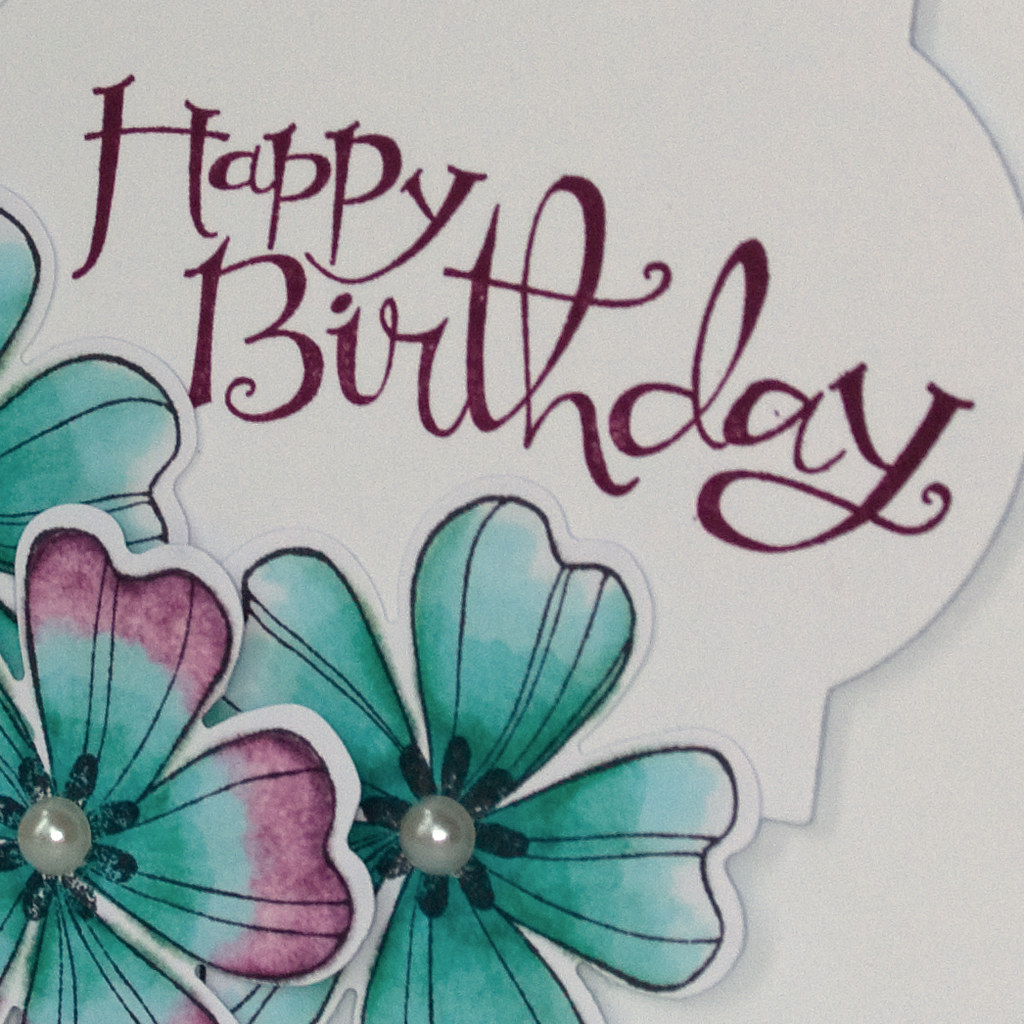
I'm loving shaped card bases at the moment, so decided to use my Window Frames Collection Framelits to make the base and the raised centre topper.

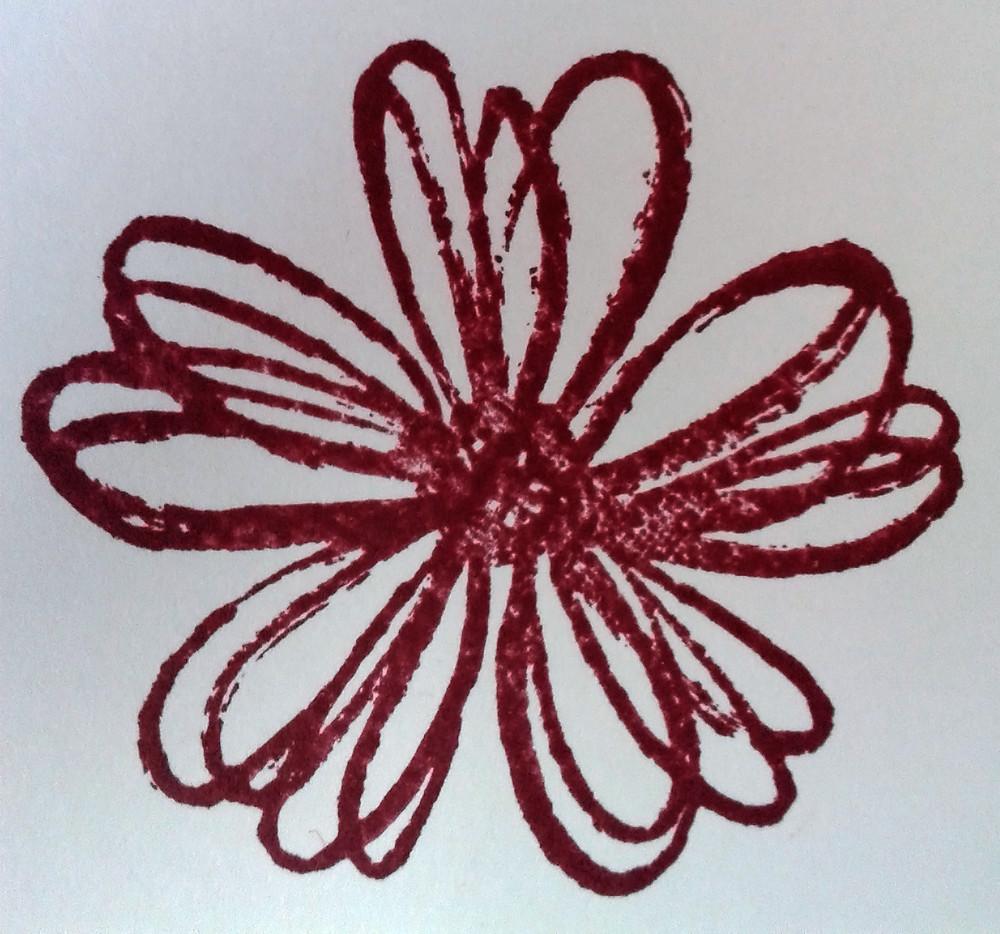
I stamped out three flowers and coloured them in using my blendabilities, these were finished with a pearl in the centre.

Using the matching Rich Razzleberry Ink I stamped my sentiment on to the centre of my topper, raised this up on 3D pads, and then arranged my flowers around the bottom edge.


Products used:
Window Frames Collection - Stampin' Up!
Sassy Salutations Stamp Set - Stampin' Up!
Flower Shop Stamp Set - Stampin' Up!
Rich Razzleberry Blendabilities - Stampin' Up!
Coastal Cabana Blendabilities - Stampin' Up!
Rich Razzleberry Ink Pad - Stampin' Up!
Basic Pearls - Stampin' Up!
Card stock from stash
Dimensionals


You may also like:
    

Saturday, 12 July 2014

new home


A nice messy challenge this week, just don't put your fingers in the wrong place!! I wanted to make my fingerprints look like birds, so decided I would make a new home card. 

I stamped my swirl across the top of the card to give somewhere to hang my bird house.

The swirl and thread stamps I used to hang my bird house are from Stampin' Up!, but I don't know the names of the sets.

I added an extra bird "fingerprint" on the inside to carry the theme through. 

Products used:
Swirl/Flourish - Stampin' Up!
Hanging Thread - Stamping' Up!
Sweet Birdhouse - Cardio Majestix
A Little Sentimental - Clearly Besotted
Marina Mist, Melon Mambo and Crumb Cake Ink Pads - Stampin' Up!

You may also like:
    

Saturday, 21 June 2014

just for you

Less is More Challenge -  WATERCOLOUR


Lovely challenge this week.... a chance to get my watercolour paints out again, something I love using!!

I shaped my card base by using the largest Window Frame Collection Die, and then echoed the shape by piercing a matching border round the edge of my card.

My stamp is "Crossing Bridges" by Penny Black, and was coloured in with watercolour paints.

I stamped my sentiment on to a scrap of card and made a small banner. Pearls were used to finish off my design.

Products used:
Crossing Bridges Stamp - Penny Black
Window Frame Collection Framelits - Stampin' Up!
Festive Paper Piercing Pack - Stampin' Up!
Watercolour Paints - Cotman
Basic Pearls - Stampin' Up!
Window Punch - Stampin' Up!
Card from stash!

You may also like:
    

Friday, 30 May 2014

happy birthday

CAS(E) this Sketch:  CAS(E) this Sketch #78


I'm loving the white on white look at the moment, so cut out my trellis border in white and added it to the front of my card.

I used my Little Leaves Sizzlets die to cut out my leaves, and made three die cut flowers.

I cut out my banner and then using my Stamp-a-ma-jig, positioned my sentiment. This was raised up on 3D pads.

Products used:
Trellis Border - Memory Box
Little Leaves Sizzlets Die - Stampin' Up!
Banner Die - Sizzix
A Little Sentimental - Clearly Besotted
Flower Die - Unknown
Card stock and Paper from stash

You may also like:
    

Sunday, 18 May 2014

THANK YOU

Less is More Challenge -  Week 172 Theme FLOWERS

CAS.ology  Week 96: FLOWER


One of my favourite stamp sets at the moment is Flower Shop by Stampin' Up! and I've made my card by combining it with the matching punch. I really like how these three colours work together, and added some pearls for effect.

I embossed a double row of lines and stamped my sentiment in to the middle of it. 


Lately whilst I have been making cards, I have tried to introduce some part of the image to the inside of my card to carry the theme through.


Products used:
Flower Shop Stamp Set and Punch - Stampin' Up!
Basic Pearls - Stampin' Up!
Morning Meadow Sentiment - Stampin' Up!
Rich Razzleberry, Daffodil Delight and Marina Mist Ink Pads - Stampin' Up!
Card from stash


You may also like:
    

Saturday, 26 April 2014

Just for You

Less is More Challenge -  Week 169 Sketch


I made my card base by running it through my Sizzix machine using the largest of my Circle Dies, just missing the top to make my hinge.

Keeping very much to the sketch I used two smaller dies to create a circular frame.This was decorated by shadow stamping with a selection of leaf stamps, and was mounted on to the card with 3D pads.

The flower was made using two flower punches, I cut in to the petals, and used my bone folder to burnish the edges so that they curled up slightly. A pearl was added to the centre to finish off.

Products used:
Flower Punch - Stampin' Up!
Petite Petals - Stampin' Up!
Circles Die Collection - Stampin' Up!
Basic Pearls - Stampin Up!
Pretty Impatiens - Cardio Majestix
Cardstock from stash

You may also like:
    

Wednesday, 16 April 2014

Just a note to say ... ... happy birthday to you !

CAS.ology  NOTE


I knew straight away what I wanted to do for this weeks challenge, I dug out one of my Penny Black Stamps called "A Song For You". I wanted to keep the guitar very much centre stage, to fit in with the key word "note", so once I had stamped and coloured it in, I used Crystal Effects to highlight the guitar. 

The base of the card was cut away using a scallop edgelits, and the matching embossing folder was also used. Some red card was attached to the front of the card to bring out the colour of the guitar. 

A couple of music notes were added to finish the image.

On the inside of my card I added a light grey duplicate image with the rest of the sentiment.

Products used:
A Song For You - Penny Black
Crystal Effects - Stampin' Up!
Large Scallop Edgelits - Stampin' Up!
Adorning Accents Large Scallop Embossing Folder - Stampin' Up!
Teen Routine - Paper Smooches
Promarkers
Card Stock from stash

You may also like:
    

Saturday, 5 April 2014

Happy Birthday - A Touch Of Turquoise

Less is More Challenge -  Colour Week 166 - A Touch Of Turquoise


How lucky was I when I saw the challenge at Less is More this morning. Yesterday I had been making a card for a friend, and this dress is a spare I made up using the left over bits and pieces, and it just happened to have a "touch of turquoise".

I glued a piece of matching turquoise card to the inside, and then used my scallop die to create a shaped edge that allowed the colour to show through.

Using my new Dress Up Framelits Die, I cut out the dress twice, once from patterned card, and the other from turquoise card, this was then cut to look like a cardigan. Mini pearls for buttons and the necklace were used to finish it off.

The sentiment was stamped on to a scrap of turquoise card and cut out with a punch.

Products used:
Dress Up Framelits - Stampin' Up!
Edgelits Large Scallop - Stampin' Up!
Occasions Stamp Set - Stamposaurus
Basic Pearls - Stampin' Up!
Card stock from stash

You may also like: