Showing posts with label CAS(E) this Sketch. Show all posts

Friday, 30 May 2014

happy birthday

CAS(E) this Sketch:  CAS(E) this Sketch #78


I'm loving the white on white look at the moment, so cut out my trellis border in white and added it to the front of my card.

I used my Little Leaves Sizzlets die to cut out my leaves, and made three die cut flowers.

I cut out my banner and then using my Stamp-a-ma-jig, positioned my sentiment. This was raised up on 3D pads.

Products used:
Trellis Border - Memory Box
Little Leaves Sizzlets Die - Stampin' Up!
Banner Die - Sizzix
A Little Sentimental - Clearly Besotted
Flower Die - Unknown
Card stock and Paper from stash

You may also like:
    

Tuesday, 15 April 2014

For You

CAS(E) this Sketch:  #72


To start with, I glued some paper to my card base, to coordinate with the card, that I was using for my sentiment and butterfly.

I stamped my Just For You message nine times, and cut them out with one of my Circle Dies. I mounted them on 3D pads and then arranged on my card front to match the sketch.

I wanted to add a highlight to my card, so cut out my butterfly, then added pearls to its body, and then attached to my card front.

My sentiment letters have been cut out twice, and then glued together, to add a bit of dimension. 


Products used:
Bonnets & Bowties Paper Pad - Lili of the Valley
For You Stamp Set - Lili of the Valley
Circles Collection Framelits Dies - Stampin' Up!
Parker Upper Case Die Alphabet Set - Memory Box
Basics Pearls - Stampin ' Up!
Butterfly Die - Sizzix


You may also like:
    

Thursday, 20 March 2014

Happy Birthday

CAS(E) this Sketch:  #69


I made a textured background for my image, with an embossing folder.  The topper has been made by using one of a nesting set of frame dies.

With the border stamp from my set, I stamped two rows, leaving space in the middle for my sentiment. I then stamped my main image twice.  It has all been coloured in with Promarkers.

Products used:
Square Lattice Embossing Folder - Stampin' Up!
Bordering on Romance Stamp Set - Stampin' Up!
Morning Meadow Stamp Set for Sentiment - Stampin' Up!
Nesting Set of Frame Dies - Sizzix
Promarkers
Card from Stash

You may also like:
    

Friday, 14 March 2014

Birthday Card with Bookmark

CAS(E) this Sketch:  #68


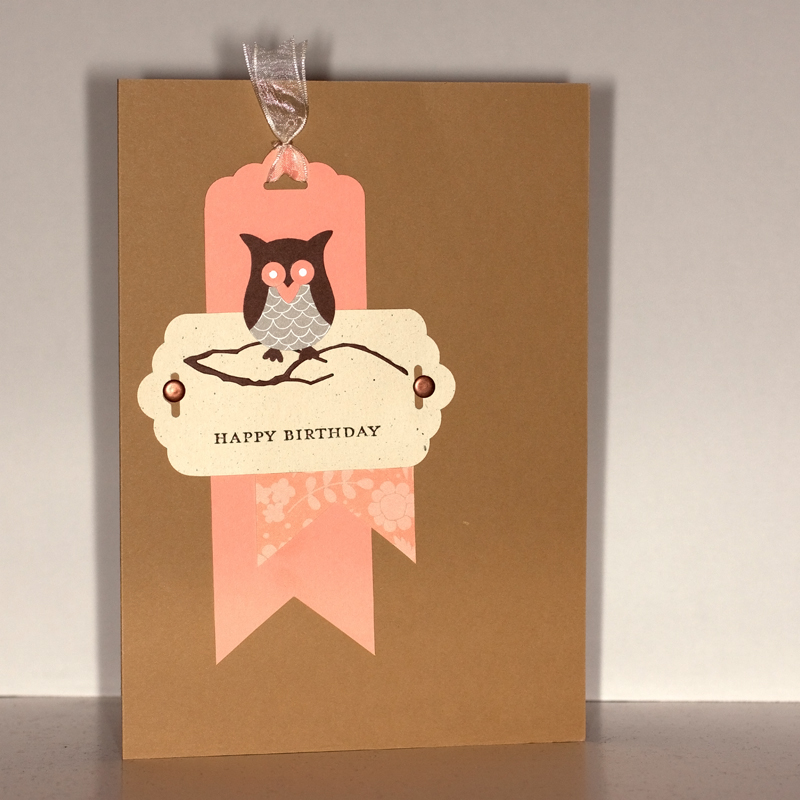
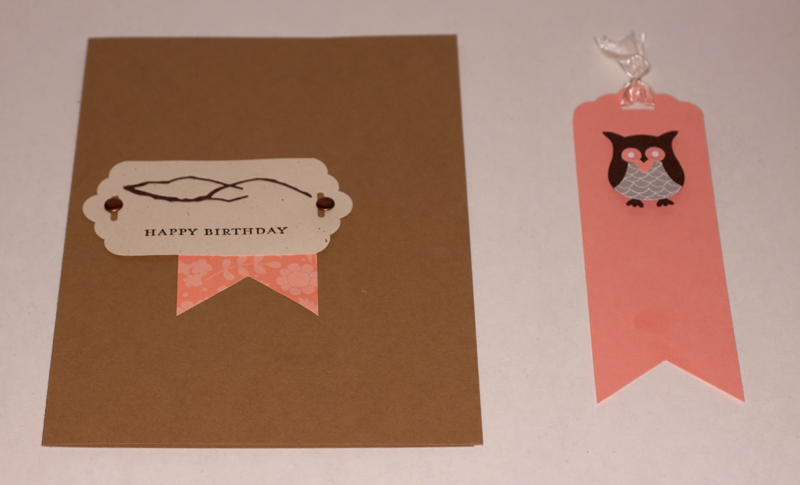
This weeks challenge, gave me the opportunity to try something that I've been wanting to do, since I received my Scallop Tag Topper Punch, and that is to make a bookmark with it.

The layout of the sketch meant that I could make my bookmark and slide it behind my sentiment panel.

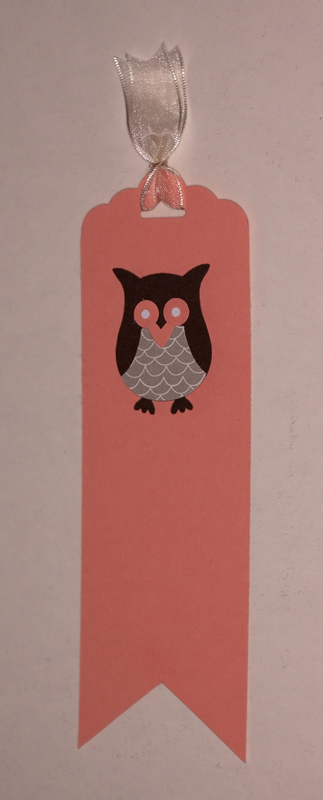
I cut a 5cm panel out of Crisp Cantaloupe card stock, and shaped it with my Scallop Tag Topper Punch. My Owl Punch has been used to decorate it. A piece of ribbon was threaded through the top and tied together with some brown embroidery thread.

My second banner was made by using a scrap of Sweet Sorbet Designer Series Paper. I wanted my sentiment banner to tie in with my bookmark, so used my Scalloped Tag Topper Punch on both ends of a scrap of Naturals Ivory card stock. I used my Woodland Branch die to cut a branch for my Owl to perch on.  Some 3D pads were used behind my Owl to raise him up, so that he could slide down to rest on his perch. A couple of brads were used on either side of my sentiment banner to hold it to the front of the card, leaving space for the bookmark to slide behind. 


Products used:
Baked Brown Sugar, Crisp Cantaloupe, Naturals Ivory Card stock - Stampin' Up!
Scallop Tag Topper Punch - Stampin' Up!
Owl Punch - Stampin' Up!
Sweet Sorbet Designer Series Paper - Stampin' Up!
Woodland Branch Die - Memory Box
Morning Meadow - Stampin' Up!
Brads, Ribbon and Embroidery Thread from stash

You may also like:
    

Sunday, 2 March 2014

Happy Birthday Wishes

Less is More Challenge -  Colour YELLOW & GREEN

CAS(E) this Sketch:  #66


I started with a green card base. I then used my tag topper punch and created a tag to stamp my image on.

The image has been coloured in with Promarkers. The tag is finished off with a piece of yellow ribbon. 

Using the tag topper punch I created a small banner by cutting it down on both long sides, and the same yellow ribbon has been thread through


Products used:
Scallop Tag Topper Punch - Stampin' Up!
Simply Sketched Stamps set - Stampin' Up!
Pistachio Pudding Card - Stampin' Up!
Promarkers
White Card and Ribbon from stash

You may also like:
    

Wednesday, 19 February 2014

Happy Easter

CAS(E) this Sketch:   #64


A very simple card from me this week. I've used the branch stamp from the set Take Care to make my tree, and have coloured it in using Gumball Green and Chocolate Chip Marker Pens.

The sentiment has been placed, to fit in with the sketch.

Products used:
Take Care Stamp Set - Stampin' Up!
Teeny Tiny Sentiments - Stampin' Up!
Chocolate Chip and Gumball Green Marker Pens - Stampin' Up!
Cardstock from stash

You may also like:
    

Thursday, 6 February 2014

Happy Birthday

CAS(E) this Sketch:   #63


To frame my flowers, I pierced a double row of holes. I made my flowers by using three different coloured scraps of card. My bird punch wing made the leaves, and these were inserted under the flowers.

The sentiment has been stamped on to a banner, and raised up on 3D pads.

I've used some rhinestones in the centre of the flowers for a bit of sparkle.


Products used:
Festive Paper-Piercing Pack - Stampin' Up!
Bird Punch - Stampin' Up!
Banner Die - Sizzix
Cardstock, Flower Die and Rhinestones from stash

You may also like: